

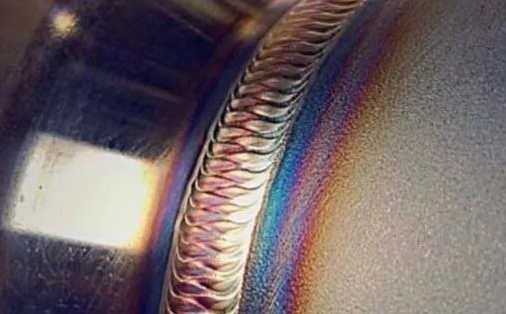
TIG welding is known for its precision and clean finish. It is a go-to method for welding various metals, from aluminum to stainless steel. It allows for detailed work and produces high-quality welds ideal for aesthetic and structural applications. However, many welders—beginners or experienced often ask, “Why are my TIG welds so bad?” Poor TIG welds can result from various issues, such as contamination, incorrect settings, or improper technique.
In this article, we will explore the most common reasons for bad TIG welds and offer solutions to help you improve your welding results.
Common TIG Welds Defects and Solutions in Engineer Manufacturing

There are many weld defects that can make TIG welding bad. Here are some of the common reason as well as their causes and solutions:
Porosity
Porosity refers to small gas pockets or holes within the weld, which weaken the weld and reduce its durability. This defect compromises the structural integrity and negatively affects the weld’s appearance.
Causes
- Contaminated base metal or filler rod: Dirt, oil, rust, or other contaminants on the workpiece or filler rod can introduce gas into the weld.
- Improper shielding gas coverage: Insufficient or inconsistent gas flow allows air (oxygen, nitrogen, or hydrogen) to contaminate the weld pool.
- Leaks in the gas supply system: Cracked hoses or loose fittings can cause air to mix with the shielding gas, leading to porosity.
- Excessive gas flow rate: A gas flow rate that is too high can create turbulence, drawing in atmospheric air and introducing it into the weld.
- Moisture: Water or moisture on the welding surface or electrode can vaporize during welding, introducing hydrogen into the weld, which causes porosity.
Solutions
- Clean the base metal and filler rod thoroughly: Before welding, use a wire brush or chemical cleaner to remove all contaminants from the workpiece and filler rog.
- Ensure proper shielding gas flow: Set the gas flow rate between 15-20 CFH (cubic feet per hour) and check the gas supply system, including hoses, fittings, and the regulator, for leaks or damage.
- Avoid drafts or windy conditions: Wind can disrupt the shielding gas, so weld in a protected environment or use a welding screen to shield the work area.
- Dry the welding surface and electrode: Ensure the workpiece and electrode are completely dry before welding to prevent moisture from causing porosity.
Weld Crack
Weld cracks are fractures that can appear in the weld or base metal, either during welding or after cooling. These cracks compromise the strength and durability of the weld.
Causes
- Excessive heat input: Applying too much heat causes the weld area to expand and contract rapidly, leading to cracks during cooling.
- Improper filler material: Using a filler metal that does not match the base metal in composition and mechanical properties can lead to cracking.
- Rapid cooling: Quick cooling, especially in high-carbon or thick metals, causes uneven contraction and can induce cracking.
- Residual stress: Weld joints with poor design or improper welding sequence can create stress points where cracking occurs.
- Hydrogen embrittlement: Hydrogen introduced into the weld through moisture or contamination can cause cracks, particularly in high-strength steel.
Solutions
- Control heat input: Adjust welding parameters to reduce excessive heat. Use appropriate amperage and travel speed to avoid overheating the material.
- Select appropriate filler metal: Ensure the filler rods’ composition and properties match those of the base metal to avoid mismatch issues.
- Preheat and post-heat thicker metals: Preheat thicker sections, especially in high-carbon steels, and allow them to cool gradually to reduce the risk of cracking. Optimise joint design and welding sequence: Ensure joints are appropriately designed to minimize stress concentrations and use a balanced welding sequence to distribute heat evenly.
- Prevent hydrogen contamination: Dry the base metal, filler rod, and electrode to prevent moisture from entering the weld pool, and use low-hydrogen filler rods.
Incomplete Fusion
Incomplete fusion is a common defect where the weld metal does not fully fuse with the base metal or previous weld passes, weakening the joint.
Causes
- Insufficient heat input: Low amperage or high travel speed may cause the arc to skim the surface without fully melting the base metal.
- Improper torch angle: Incorrecttorch positioning can prevent the arc from properly reaching and melting the joint edges.
- Dirty or contaminated surfaces: Dirt, rust, or grease on the base metal inhibits bonding between the filler and base metal.
- Wide root opening or improper joint fit-up: If the gap between workpieces is too large, it can cause incomplete bonding across the joint.
- Incorrect filler rod placement: If the filler rod is not consistently placed in the molten pool, it can prevent adequate bonding.
Solutions
- Increase heat input: Use higher amperage or slow the travel speed to ensure the base metal melts and fuses appropriately with the filler metal.
- Adjust torch angle: Maintain a torch angle of 15-20 degrees from vertical for better control and complete coverage of the weld joint.
- Clean the base metal thoroughly: Ensure the workpiece is free of dirt, rust, oil, and other contaminants to promote complete fusion.
- Improve joint fit-up: Ensure proper alignment and a gap between workpieces, aiming for a gap that is not wide to enable adequate bonding.
- Properly place filler rod: Ensure the filler rod consistently melts into the weld pool and bonds with the base metal.
Crater Formation
Crater formation is a common TIG welding defect at the end of a weld pass, resulting in a depression or pit in the weld bead. These craters can lead to cracking or weakening of the weld.
Causes
- Sudden termination of the arc: Quickly stopping the arc at the end of a weld can leave a crater, as the molten metal doesn’t have time to cool and solidify evenly.
- Insufficient filler metal at the end of the weld: Failing to add enough filler metal as you end the weld pass can leave a depression.
- Excessive heat input near the end of the weld: Overheating the material towards the end of the weld can cause the metal to sink and create a crater.
- Fast withdrawal of the torch: Rapidly moving the torch away from the weld at the end of the pass may result in inadequate shielding gas coverage, which can also lead to crater formation.
Solutions
- Use a controlled arc stop technique: Gradually reduce the amperage as you finish the weld to allow the molten pool to solidify without forming a crater.
- Add filler material before ending the weld: Introduce extra filler metal just before you finish the weld pass to fill the potential crater area.
- Use a post-weld technique: After finishing the weld, briefly retrace the end with the torch to allow for smoother solidification.
- Maintain shielding gas coverage: Keep the torch in position and continue shielding gas flow for a moment after stopping the arc to allow the weld pool to solidify evenly.
Tungsten Inclusions
Tungsten inclusions occur when pieces of the tungsten electrode break off and become embedded in the weld, leading to contamination. This can compromise the strength and appearance of the weld.
Causes
- Touching the tungsten to the workpiece or filler rod: Accidentally touching the tungsten electrode to the workpiece or filler rod can cause it to break off and contaminate the weld.
- Excessive current for tungsten size: Using too much amperage for the size of the tungsten electrode can cause it to degrade and break apart.
- Improper electrode preparation: Poorly sharpened tungsten or the use of a contaminated electrode can result in tungsten particles entering the weld pool.
- Overheating the tungsten: Prolonged exposure to high temperatures can weaken the electrode, causing small fragments to break off.
Solutions
- Maintain proper torch technique: Control the arc length consistently to avoid letting the tungsten electrode touch the workpiece or filler roh.
- Use the correct amperage: To prevent overheating or degradation, ensure that the amperage setting is appropriate for the tungsten size.
- Sharpen and clean the tungsten: To avoid contamination, always properly sharpen and clean the tungsten electrode before welding.
- Monitor the tungsten temperature: Take breaks if necessary to prevent the tungsten from overheating during prolonged welding sessions.
Conclusion
When done incorrectly, TIG welding can lead to defects, which are common challenges welders face in engineering and manufacturing. However, welders can significantly improve weld quality by identifying the root causes and proper techniques. Taking preventive steps and adjusting as needed helps create strong, clean, durable welds, reducing defects and boosting performance. Mastering these techniques leads to better results and long-term reliability in TIG welding. You can also look for top TIG welding services to get the best weld.