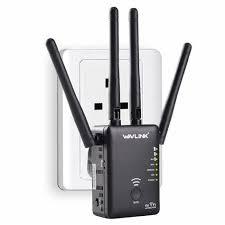
Would you like to get all the information on the Wavlink extender configuration process? Before the setup first, you should know about the Wavlink extender login. Because it’s a very important process. After the login procedure, you can easily configure your Wavlink device. Here are some tips, which you can follow very easily.
Steps For Login Into Wavlink Device
Users can log in via WIFi.Wavlink.com to the Wavlink extender login page to configure and control the Wavlink extender. You must connect your extender to the router and a WiFi-enabled device via an ethernet connection to access the WiFi Wavlink login page.
Before starting the login steps, keep in your mind do not skip any step:
- Open your device’s preferred browser after connecting it to the extender network.
- Press the enter key after typing WiFi.Wavlink.com in the address field of the web browser.
- To finish the Wavlink login process, input your login information on the login screen and touch the login button.
Note: For Wavlink login, the standard credentials are admin and admin. Enter the new password if you change the log in one.
Installation Of The Wavlink Extender Via WPS Button
With this technique, you can configure the Wavlink extender without entering a user ID and password. For the Wavlink WiFi range extender setup with the WPS button, follow the instructions below:
- First and most importantly, plug in and turn on your Wavlink extender close to your WiFi home router.
- Next, find the WPS button on the Wavlink device and push it for 2 seconds. Release the WPS button after that.
- Within two minutes of hitting the extender button, press the WPS button on the WiFi router.
- The Wavlink extender’s LED light turns green when it successfully connects to the wireless network.
- Finally, you can join your WiFi-enabled devices to the Wavlink extender network by plugging your extender into the new location.
Wavlink Extender Installation Through Web UI
The instructions for setting up WiFi.Wavlink.com are as follows:
- The Wavlink gadget should first have the antennae attached before being plugged into a power outlet.
- Go to the WiFi settings after you turn on your computer or mobile device.
- Attach your device to the extender’s network after which you can start any browser of your choice.
- Enter WiFi.Wavlink.com in the browser’s address bar.
Tip: You can use the IP address 192.168.10.1 if you are unable to access the WiFi.Wavlink.com web interface.
Setup For 192.168.10.1 Login
- Press the enter key after typing the website address, then type your login information on the following page.
- Select your time zone, nation, and location in the following step. Then, establish a password and hit the next button.
- Next, choose an SSID and password for the 5 GHz bands. Alternatively, you can use the same information for both bands.
- Select a router network security passcode now, then click the Next button.
- To finalize the Wavlink extender setup procedure, check your settings and select the finish button.
- To activate the settings, you must wait a short while for the extender to reboot completely.
- Connect your device to the extender’s network using the modified settings once the procedure is finished.
- To have a perfect internet connection, you can move the Wavlink extender to a new position.
Troubleshooting Steps For Wavlink WiFi Extender
If you are facing any errors while using the Wavlink WiFi extender, then consider and verify these points:
- The distance between your extender and router.
- Working on the router.
- Verify the connection between the extender and router.
Note: After verifying these points follow the tips to fix errors:
Adjust The WiFi Channel Width
Have you ever considered how to configure your router for optimal performance? You may experience better internet speed by using these settings. The channel width of your network can alter. The ideal router configuration can be achieved by adjusting the channel width. Make your channel width as small as possible to eliminate interference. In the alternative, the number of interferences will increase with the WiFi channel’s breadth.
Install A Mesh WiFi Network
No matter how large or expensive a single router is, it cannot provide a strong enough WiFi signal to reach the entire area. The most common solution to this issue is to install a mesh WiFi network, which comprises numerous satellite and main routers that both offer the fastest WiFi coverage. There are numerous mesh WiFi systems in the market now from companies like Orbi, Asus, Google, etc.
Remove Extra Gadgets
It’s possible that the Wavlink extender won’t be able to receive fresh requests if you’re utilizing many computers or devices. You should immediately unplug any additional WiFi devices that are linked to the network.
Reboot Your Extender
In this case, you must deactivate your Wavlink WiFi extender. Take a moment to relax. Then switch it back on. Your extension then emits a constant green light.
A Faster Internet Upgrade
Checking your internet speed is the most crucial step. Call your service provider to check your current connection or change your plan if you believe it is not operating at 100%. Your internet connection can be simply too slow at times. You must therefore upgrade to a faster internet package in that situation. You can then get quick speed.
Modify The Frequency Of Band
Two bands are present. The 2.4GHz band is the first, while the 5GHz band is the second. We shall now describe how the two bands differ from one another. When possible, you can quickly switch your device from the 2.4GHz band to the 5GHz band if you have a dual-band or tri-band extender.
The slower 2.4GHz spectrum is used by many smart home appliances. The 5GHz band, which is faster than the 2.4GHz band, can be used to link devices like smartphones, LED TVs, laptops, and speakers. Visit this link wavlink extender login to check the band if you are unsure how to determine the WiFi band you are using.
Key Take a way
On this page, we give you knowledge about Wavlink extender login steps and also you get information on the setup process. After reading this article you will be able to configure and use your extender conveniently and also for more information you can visit our wavlink customer service page.


