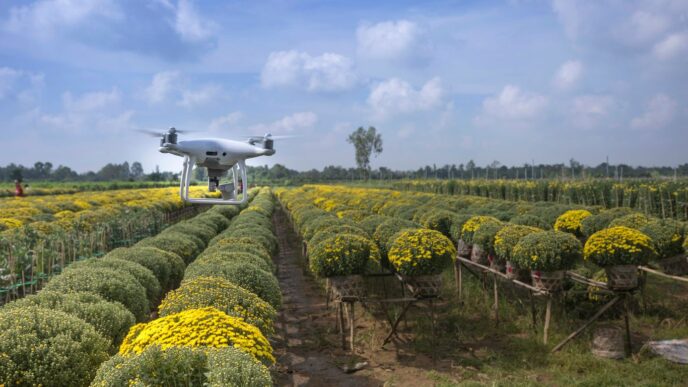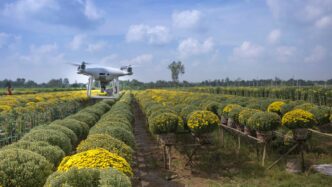
Farming is changing, and flying gadgets are becoming a big part of it. These drones help farmers keep a closer eye on their fields, sort of like having a super-powered pair of binoculars for your crops. They can spot problems early, figure out where plants need more water or food, and generally make farming smarter. This guide is all about how to use these drones for what we call crop scouting with drones, making sure you get the most out of your fields and your tech.
Key Takeaways
- Picking the right drone for your farm means looking at how big your fields are, what you can spend, and what kind of details you need to see. Don’t forget to check out the software that goes with it too.
- Before you fly, always do a check-up on your drone. Make sure the batteries are good, the cameras are clean, and you know the local rules about flying. This keeps things safe and makes sure your data is good.
- Collecting good data is about flying smart. Plan your flights so you cover everything, use the right cameras (like multispectral ones) to see things humans can’t, and try to collect data around the same time each week or two.
- Just collecting data isn’t enough. You need to look at it. Software can turn those pictures into maps that show you where problems are, like dry spots or where pests might be hiding.
- Using drone data helps you farm smarter. You can give different parts of your field exactly what they need, like water or fertilizer, instead of treating the whole field the same way. This saves resources and can lead to better harvests.
Getting Started with Crop Scouting with Drones
So, you’re thinking about using drones to keep an eye on your crops? That’s a smart move. It might seem a bit techy at first, but honestly, it’s not as complicated as it looks. Think of it like getting a new tool for the farm – you need to pick the right one and learn how to use it properly.
Choosing the Right Drone for Your Farm
First things first, you need a drone. But not just any drone. You’ve got to pick one that fits your farm. How big is your place? What’s your budget looking like? Do you need super-detailed pictures, or is a general overview okay? For smaller fields, a basic drone might do the trick. But if you’ve got acres to cover, you’ll probably want something a bit more robust, maybe with special cameras that can see things our eyes can’t. It pays to do a little homework here, read what other farmers are saying, and compare what different models can do. The drone you choose is the foundation for all the data you’ll collect.
Understanding Drone Software and Platforms
Once you have your drone, you’ll need software to tell it where to fly and what to do. Most drone makers have their own apps, which are usually pretty straightforward. But there are also other programs out there, like DroneDeploy or Pix4D, that offer more advanced features. These can help you create maps of your fields, track plant health, and even put together reports automatically. It’s worth exploring a few options to see which one makes the most sense for how you work.
The Importance of Training and Certification
Now, about flying it. While you might not always need a special license, getting some training is a really good idea. It’s not just about not crashing the drone (though that’s important!). Proper training helps you fly safely and get the best possible data. You can find online courses or even local workshops. In some places, you might actually need a certification to fly for farm work, so it’s smart to check your local rules. Think of it as learning the best way to use your new tool so you don’t end up with a mess.
Best Practices for Effective Drone Operation
Alright, so you’ve got your drone, you’re ready to fly, but hold on a second. Just like you wouldn’t jump into a tractor without checking the fuel and oil, you can’t just launch your drone without a proper plan. Getting this part right means safer flights, better data, and fewer headaches down the road.
Conducting Thorough Pre-Flight Checks
This is non-negotiable. Before every single flight, you need to give your drone a good once-over. Think of it as a quick but important ritual. You’re looking for anything that seems off. Are the propellers looking good, no cracks or chips? Are the batteries fully charged and seated correctly? How about the camera lens – is it clean? You’d be surprised how much dust or a smudge can mess up your pictures. Also, make sure your remote controller has a good charge too; nobody wants to lose signal mid-flight because of a dead controller battery.
Here’s a quick checklist:
- Physical Inspection: Check the drone’s body, arms, and landing gear for any damage. Look closely at the propellers for nicks or bends – even small ones can cause problems.
- Battery Check: Ensure all batteries (drone and controller) are fully charged and properly installed. Check for any swelling or damage to the batteries.
- Camera and Gimbal: Clean the camera lens. Make sure the gimbal moves freely and isn’t obstructed.
- Software Updates: Confirm that your drone’s firmware and the flight control app are up-to-date. Sometimes, updates fix important bugs or improve performance.
- GPS Signal: Wait for a strong GPS lock before taking off. A weak signal can lead to navigation issues.
Adhering to Local Regulations and Airspace Restrictions
This is where things can get a bit tricky, but it’s super important. You can’t just fly anywhere you want. There are rules, and breaking them can lead to some serious trouble, like fines or even having your drone confiscated. First off, know your local laws. In the US, for example, if you’re flying for anything related to your farm business, you likely need a Part 107 certification from the FAA. Even with that, you need to be aware of restricted airspace. Think about places like airports, military bases, or even temporary flight restrictions for events. Apps like Aloft can help you check this stuff in real-time. It’s always better to be safe and check than to get caught out.
Key things to remember:
- Know Your Certification: Understand if you need a commercial pilot license (like the FAA’s Part 107) for your operations.
- Check Airspace Maps: Use reliable apps or websites to identify any no-fly zones or temporary flight restrictions in your area.
- Respect Privacy: Be mindful of people’s privacy. Avoid flying over private property without permission and don’t record individuals without their consent.
- Communicate: If you’re flying near populated areas or sensitive locations, letting local authorities or landowners know beforehand can prevent misunderstandings.
Ensuring Optimal Drone and Sensor Performance
Getting good data is the whole point, right? So, you need to make sure your drone and its sensors are working their best. This goes beyond just the pre-flight check. Think about the environment you’re flying in. Extreme heat or cold can affect battery life and electronics. If you’re using specialized sensors, like multispectral cameras, make sure they’re calibrated correctly. Some sensors need to be calibrated before each flight or at least regularly. Also, consider how you’re flying. Flying too high or too low, or at inconsistent speeds, can impact the quality and overlap of your images. Consistent flight patterns and proper sensor settings are key to collecting data you can actually use. If you’re using a drone with RTK or PPK capabilities, make sure those systems are functioning correctly for the most accurate results. It’s all about setting yourself up for success before you even hit the ‘takeoff’ button.
Data Collection Strategies for Crop Scouting with Drones
Collecting good data is the whole point of using drones for scouting, right? If you don’t get it right from the start, all the fancy software in the world won’t help much. It’s about being methodical and thinking ahead.
Planning and Executing Drone Flights
Before you even think about taking off, you need a plan. This isn’t just about pointing the drone and hoping for the best. You’ve got to map out your flight paths. Most drone software lets you do this pretty easily. You can set the altitude, overlap between images, and the general area you want to cover. The goal is to get consistent, high-quality images that cover your entire field without missing spots.
Think about the time of day, too. Early morning or late afternoon often gives you the best light, with fewer harsh shadows. And obviously, you want to avoid flying when it’s super windy or raining. A good flight plan also considers the specific information you’re trying to gather. Are you looking for early signs of disease? Nutrient deficiencies? Different sensors and flight patterns might be better for different issues.
Here’s a quick rundown of what to consider when planning:
- Flight Path Design: Use software to create automated paths for full coverage and consistent overlap.
- Altitude and Speed: Set these based on the resolution needed and the drone’s capabilities.
- Time of Day: Aim for optimal lighting conditions to reduce shadows and glare.
- Weather Conditions: Check forecasts for wind, rain, and cloud cover.
Utilizing Multispectral and Thermal Sensors
Most drones used for agriculture come with standard RGB cameras, which are like your eyes. But to really see what’s going on under the surface, you need more specialized sensors. Multispectral sensors are a game-changer. They capture light in different bands beyond what we can see, like near-infrared (NIR). This lets you create maps like NDVI (Normalized Difference Vegetation Index). NDVI is great for showing plant health and vigor. Areas with stressed or unhealthy plants will show up differently on the map than healthy ones.
Then there’s thermal imaging. This sensor detects heat. Why is that useful? Well, plants under stress from lack of water often show higher temperatures because they aren’t transpiring as much. You can also spot irrigation leaks or areas where water isn’t flowing correctly. Combining data from RGB, multispectral, and thermal sensors gives you a much more complete picture of your field’s condition.
Here’s a look at what different sensors can tell you:
| Sensor Type | What it Captures | Primary Use Cases |
|---|---|---|
| RGB (Standard) | Visible light (red, green, blue) | General visual inspection, identifying obvious issues like lodging or weed patches |
| Multispectral | Visible light + Near-Infrared (NIR) | Plant health assessment (NDVI), nutrient stress, disease detection |
| Thermal | Infrared radiation (heat) | Water stress detection, irrigation issues, pest activity, soil temperature |
Establishing Consistent Data Collection Routines
One flight is interesting, but a series of flights over time is where the real value comes in. You need to set up a routine. This means flying your fields at regular intervals, say, every week or every two weeks, especially during critical growth periods. It’s like going to the doctor for regular check-ups; you want to catch problems early before they become big issues.
Consistency is key here. Try to fly at roughly the same time of day and under similar weather conditions if possible. This reduces variability in the data that isn’t related to the crop itself. When you have a consistent stream of data, you can track changes, see how your interventions are working, and predict potential problems before they significantly impact your yield. It builds a historical record that becomes incredibly useful for making better decisions year after year.
Analyzing Drone Data for Informed Agricultural Decisions
So, you’ve flown your drone, collected all that cool imagery, and now you’re staring at a bunch of files. What next? This is where the real magic happens – turning those pictures and readings into actual, useful information for your farm. It’s not just about seeing what your fields look like from above; it’s about understanding what that view tells you about your crops and soil.
The goal here is to transform raw data into actionable insights that help you farm smarter, not harder.
Transforming Raw Data into Actionable Insights
First off, that data from your drone, especially from multispectral or thermal sensors, isn’t something you can just look at and instantly know what’s going on. You need special software to process it. Think of it like translating a foreign language. This software takes the sensor readings and turns them into maps and charts that make sense. These tools can highlight areas in your fields that might be struggling with nutrient deficiencies, water issues, or even early signs of pests or diseases. It’s pretty neat how it can pinpoint specific spots that need attention, rather than you having to guess or treat the whole field uniformly.
Interpreting Vegetation Index Maps
One of the most common outputs you’ll see is a vegetation index map, like NDVI (Normalized Difference Vegetation Index). This map uses color coding to show how healthy your plants are. Bright green usually means healthy, vigorous growth, while yellow or red might indicate stress. You can learn a lot by looking at the patterns on these maps. Are there large patches of stressed plants? Is it a specific row? Or is it just one or two plants? This visual information is super helpful for figuring out where to focus your efforts. You can also compare these maps over time to see if your interventions are working or if problems are spreading.
Integrating Drone Data with Farm Management Systems
To really get the most out of your drone data, you’ll want to combine it with other information you already have. This means linking it up with your existing farm management software. Think about overlaying your drone maps with:
- Soil test results: See if plant stress correlates with specific soil types or nutrient levels.
- Weather data: Understand how recent rainfall or temperature changes might be affecting crop health.
- Historical yield data: Identify areas that consistently underperform or overperform.
- Irrigation records: Check if water application matches plant needs shown in the drone data.
By bringing all this information together, you get a much clearer picture. It helps you make more precise decisions about where to apply fertilizer, how much water to use, or where to scout for pests. It’s about building a complete story of your field, not just looking at one piece of the puzzle.
Implementing Precision Farming with Drones
So, you’ve got your drone, you’ve flown it around, and you’ve got all this data. Now what? This is where precision farming really kicks in. It’s all about using that information to make smarter choices for your fields, instead of just doing things the way they’ve always been done. Think of it as giving your farm a custom treatment plan, rather than a one-size-fits-all approach.
Assessing Farm Needs and Setting Goals
Before you even think about flying, you gotta know what you’re trying to fix or improve. Are you losing too much water? Are pests showing up in specific spots? Maybe you just want to boost your overall yield. Figuring this out is step one. You can’t really aim if you don’t know the target, right? So, sit down and really think about what you want to achieve with drone technology. It helps you pick the right drone, the right sensors, and most importantly, the right questions to ask of your data.
Preparing Your Fields for Drone Integration
Okay, so you know your goals. Now, let’s get the fields ready. This isn’t about changing the land itself, but more about setting up the groundwork for the drone data to be useful. First off, make sure you’re following all the local rules about flying drones. Nobody wants a fine or a stern talking-to from the FAA. Then, think about your fields. Are there any big obstacles? Do you have a way to mark specific areas if you need to? It’s also a good idea to get some basic ground truth data – maybe some soil samples or a quick walk-through – before you start relying solely on drone data. This gives you something to compare against later.
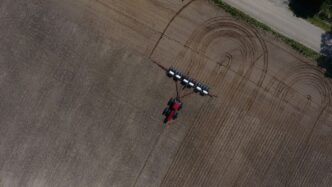
Leveraging Data for Targeted Interventions
This is the payoff part. You’ve got your drone data, and you’ve processed it into maps showing things like plant health or moisture levels. Now you can actually do something with it. Instead of spraying fertilizer everywhere, you can apply it only where the plants need it. If you see a patch of stressed crops, you can go check it out immediately and figure out why. This targeted approach means you’re not wasting resources, and you’re addressing problems before they get out of hand. It’s about being efficient and smart with your inputs, which is good for your wallet and the environment.
Here’s a quick look at how different data types can guide your actions:
- Vegetation Index Maps (e.g., NDVI): These maps highlight areas of healthy vs. stressed vegetation. Use them to identify nutrient deficiencies, disease pressure, or irrigation issues. You can then plan targeted fertilizer applications or spot treatments.
- Thermal Imagery: This shows temperature variations. It’s great for detecting irrigation problems – dry spots will be hotter. You can also spot issues with plant stress that might not be visible yet in other imagery.
- High-Resolution RGB Imagery: Good old-fashioned color photos. These are useful for visual inspection, identifying weeds, or assessing physical damage from hail or wind. They help confirm what the other sensors are showing.
Maximizing the Impact of Drones in Agriculture
So, you’ve got your drone, you’re collecting data, and you’re starting to see what’s going on in your fields from a new perspective. That’s awesome! But how do you really make sure this technology is paying off in the long run? It’s not just about flying the drone; it’s about what you do with the information it gives you and how it fits into your whole farm operation. The real magic happens when drone data becomes a regular part of your decision-making process.
Benefits of Drone-Enabled Precision Agriculture
Using drones for farming isn’t just a fancy gadget; it actually makes a big difference in how efficiently you can run things. Think about it: instead of guessing or walking miles of rows, you get a clear picture of what each part of your field needs. This means you’re not wasting water, fertilizer, or pesticides on areas that don’t need them. Some farmers have seen water use drop by as much as 30% just by watering where it’s actually needed, and that’s without hurting crop yields. It’s good for your wallet and good for the environment, too.
- Better Resource Use: Apply inputs only where and when they’re needed, cutting costs and reducing environmental impact.
- Early Problem Detection: Spot diseases, pests, or nutrient issues before they become big problems, saving crops and reducing the need for widespread treatments.
- Increased Yields: By making smarter, data-driven decisions, farms can see yield increases of 10-15%.
- Time and Labor Savings: Cover large areas quickly, freeing up your time for other important tasks.
Addressing Challenges and Limitations
Now, it’s not all sunshine and perfect data. There are definitely some hurdles to jump over. For starters, the initial cost of a good drone and the software to go with it can be a bit steep. Plus, you need to know how to fly it safely and legally – those regulations aren’t just suggestions. Sometimes, the weather just doesn’t cooperate, grounding your drone when you need it most. And let’s be honest, interpreting all that data can be tricky at first. It takes some learning to turn those colorful maps into actual actions on the ground.
- Cost: Initial investment in hardware and software can be significant.
- Regulations: Understanding and complying with local drone laws is a must.
- Weather Dependency: Flights can be delayed or canceled due to wind, rain, or poor visibility.
- Data Interpretation: Requires learning new skills and software to get actionable insights.
Continuous Learning and Technology Adoption
The world of ag-tech moves fast, and drones are no exception. What’s cutting-edge today might be standard tomorrow. To keep getting the most out of your drone program, you’ve got to stay curious. This means keeping up with new sensor technologies, software updates, and different ways to analyze your data. Maybe you’ll explore using drones for things like mapping field topography for better drainage or even for targeted spraying. The key is to not just use the tech, but to actively learn and adapt as it evolves. Think of it as an ongoing conversation with your fields, getting smarter and more efficient year after year.
Wrapping It Up
So, we’ve gone over how drones can really change how we farm, giving us a better look at our fields than ever before. It’s not just about having a cool gadget; it’s about using that information to make smarter choices. From checking on plant health to figuring out where to water or fertilize, this tech helps us be more efficient. It might seem like a lot to take in at first, with all the different drones and software out there, but remember to start simple. Practice, learn as you go, and don’t be afraid to ask questions. The goal is to use these tools to grow better crops and take care of the land. It’s a big step, but one that’s definitely worth taking for the future of farming.
Frequently Asked Questions
What kind of drone should I get for my farm?
Think about how big your farm is and how much money you want to spend. For smaller farms, a simpler drone might be fine. But if you have a lot of land, you might need a drone with special cameras, like ones that see heat or different light colors, to get the best information.
Do I need a special license to fly a drone for farming?
It depends on where you live. Some places require a special certificate, like the Part 107 license in the US, to fly drones for work. It’s always a good idea to check your local rules before you fly to make sure you’re following the law.
How often should I fly my drone over my fields?
It’s best to fly your drone regularly, especially during important growing times. Flying it every week or two can help you spot problems early, like if plants are getting sick or not enough water, so you can fix them quickly.
What do I do with all the pictures and data the drone collects?
You’ll need special computer programs to look at the drone’s pictures. These programs can turn the images into maps that show which parts of your field need help. This information helps you decide exactly where to water, fertilize, or treat for bugs.
Can drones help me save money on my farm?
Yes! By using drone data, you can be more precise with things like water and fertilizer. This means you won’t waste resources on areas that don’t need them, which can save you money and help your crops grow better.
What if my drone breaks or the data isn’t right?
Before you fly, always check your drone to make sure it’s working perfectly. This includes checking the battery, cameras, and other parts. If something goes wrong, it might be because the drone wasn’t checked properly. Also, flying in good weather helps get better pictures.