Getting a garment from a sketch to something you can actually wear involves a lot of steps, and one of the most important is pattern making. It’s basically the blueprint for your clothing, making sure it fits right and looks how you imagined. This guide will walk you through the whole pattern making manufacturing process, from the first idea to the final pattern ready for production.
Key Takeaways
- Pattern making is the process of creating a 2D blueprint that translates a 2D design sketch into a 3D garment.
- The pattern making manufacturing process involves several stages: project intake, drafting, fitting, sample evaluation, and finalization.
- A production-ready pattern includes a basic block, design lines, construction details, seam allowances, and grainlines.
- Technology like CAD software is used for precision, scalability, and global compatibility in pattern making.
- Detailed Pattern Making Cards document every aspect of the pattern, and alteration services allow for ongoing design evolution.
Understanding the Fundamentals of Pattern Making
So, you’re looking to get into making clothes, huh? Before you even think about cutting fabric, you’ve got to get a handle on pattern making. It might sound a bit technical, but really, it’s just about creating the blueprints for your garments. Think of it like this: a designer sketches a cool idea, and the pattern maker figures out how to turn that flat drawing into something that actually fits on a person.
What is Pattern Making?
At its core, pattern making is the process of creating templates, or patterns, that act as guides for cutting fabric. These aren’t just random shapes; they’re carefully measured and drafted pieces that, when put together, form a three-dimensional garment. This is how we bridge the gap between a 2D sketch and a wearable piece of clothing. Without accurate patterns, your fabric pieces just won’t line up right, and you’ll end up with something that doesn’t fit or hang the way it’s supposed to. It’s all about translating the designer’s vision into something tangible that can be sewn. You can find out more about the different methods used in pattern making.
The Role of Patterns in Garment Creation
Patterns are pretty much the backbone of garment production. They dictate not only the shape and size of each fabric piece but also how they’ll be assembled. A well-made pattern considers things like:
- Fit: How the garment will sit on the body, including ease of movement.
- Construction: How the pieces will be sewn together, including seam types and finishes.
- Fabric: How the chosen material will behave and drape.
Essentially, the pattern is the instruction manual for the sewing process. If the pattern is off, the final garment will be too. It’s a critical step that ensures consistency and accuracy, especially when you’re making multiple sizes or multiple units of the same item.
Bridging Design and Production
Pattern making is where the creative side of design meets the practical side of manufacturing. A designer might have a fantastic idea, but it’s the pattern maker who figures out the technical details to make it a reality. They think about:
- How to create shaping using darts or seams.
- Where to place design lines, like princess seams or yokes.
- How to add necessary details like pockets or collars.
This translation process is vital. It ensures that the garment not only looks good on paper but also functions well and fits correctly when worn. It’s a detailed process that requires a good eye for both aesthetics and construction.
Essential Stages in the Pattern Making Manufacturing Process
So, you’ve got a cool idea for a garment, maybe a sketch or even a rough drawing. That’s awesome! But how do you actually turn that into something real that people can wear? That’s where the pattern making process really kicks in. It’s like building a blueprint for your clothes. This isn’t just about drawing lines; it’s a whole sequence of steps to make sure your design works in the real world.
Project Intake and Defining the Garment Blueprint
First things first, we need to get on the same page. This is all about understanding exactly what you want. We’ll chat about your design, look at any sketches you have, and figure out the nitty-gritty details. What kind of fit are you going for? What are the target sizes? What fabric are you thinking of using? Getting all this sorted upfront is super important. It helps avoid confusion later on and makes sure everyone knows what we’re aiming for. It’s like planning a trip – you need to know your destination before you start packing.
- Reviewing your design ideas and sketches.
- Deciding on the fit and ease for the garment.
- Confirming the measurement standards we’ll use.
- Creating a clear technical drawing of the garment.
Drafting and Prototype Pattern Development
Now for the actual making of the pattern. This is where the magic starts to happen. We take all the information from the blueprint stage and start creating the first version of your pattern. We use a mix of tried-and-true methods and modern tech to get this right. The goal here is to create a prototype pattern – the very first physical representation of your design. It’s not going to be perfect yet, but it’s the foundation for everything that follows.
Fitting, Sample Evaluation, and Revision Cycles
This is a really big deal. We take that prototype pattern and make a sample garment. Then, we check it out. Does it fit right? Does it look like the design? We’ll look at how it drapes, how it moves, and if it meets all the requirements. This is where we find out what needs tweaking. It’s totally normal to make changes at this stage. We’ll adjust the pattern based on what we see and create a new sample. This back-and-forth is called a revision cycle, and we keep doing it until the fit and look are just right. Getting the fit perfect here saves a ton of headaches down the road.
| Stage | Activity |
|---|---|
| Sample Creation | Make the first physical garment from the pattern. |
| Fit Assessment | Evaluate how the sample fits on a form or person. |
| Pattern Adjustment | Modify the pattern based on fit feedback. |
| Re-sample and Re-evaluate | Repeat the process until satisfied. |
Key Components of a Production-Ready Pattern
So, you’ve got a cool design idea, and maybe even a rough sketch. That’s awesome! But turning that sketch into actual clothes that fit right and look good? That’s where the pattern comes in. A production-ready pattern isn’t just a drawing; it’s the detailed blueprint that tells the factory exactly how to cut and sew your garment. It needs to be super precise, covering everything from the basic shape to the tiniest details.
Developing the Basic Block (Sloper)
Think of the basic block, or sloper, as the foundation of your pattern. It’s a simple, fitted pattern for a basic garment shape, like a bodice, sleeve, or skirt, made directly from your core body measurements. It doesn’t have any style details yet – no fancy seams or darts. The main goal here is to get the fit and proportions just right on a standard size. This block is then used as a starting point for creating all sorts of different styles. It’s like having a perfectly fitted plain t-shirt pattern that you can then alter to make a button-down shirt, a dress, or a jacket.
Applying Design Lines and Construction Details
Once you have your basic block, it’s time to add the personality of your design. This is where you’ll draw in all the design lines – think about where the seams will go, where pockets will be placed, or if there are any pleats or gathers. If your design has darts, this is when you’ll manipulate them from the basic block to create shape and fit. For more complex designs, like those with curved seams or unique silhouettes, this stage can get pretty involved. It’s all about translating the visual idea into the actual construction pieces.
Incorporating Technical Features: Seam Allowances and Grainlines
This is where we get into the nitty-gritty details that make a pattern truly production-ready. You can’t just sew pieces together with no room for error. That’s why seam allowances are added – they’re the extra bits of fabric around the edges of each pattern piece that get sewn together. The width of these allowances is important and often depends on the type of garment and the factory’s equipment.
Then there are grainlines. These are lines drawn on each pattern piece that show you how to lay the pattern on the fabric. Following the grainline is super important for how the fabric hangs and drapes. Getting it wrong can make your garment look wonky or not hang properly.
Here’s a quick rundown of what needs to be on your pattern pieces:
- Seam Allowances: Added to all edges that will be sewn. The width is specified.
- Grainlines: A line indicating the direction of the fabric’s warp threads.
- Notches: Small marks or cuts on the edges of pattern pieces that help align them correctly during sewing.
- Dots/Points: Marks indicating where specific construction points should meet.
- Piece Names and Sizes: Clearly labeling each part and the size it belongs to.
- Quantity: How many of each piece to cut (e.g., ‘Cut 2 Selvedge’).
Leveraging Technology for Precision in Pattern Making
These days, you can’t really get far in manufacturing without using some kind of computer program to help out. It’s not just about making things faster, though that’s a big part of it. Using the right software means your patterns are going to be spot-on accurate, which saves a ton of headaches down the line. Think about it: a tiny mistake in a pattern can lead to a whole batch of clothes that just don’t fit right. That’s a costly problem to fix.
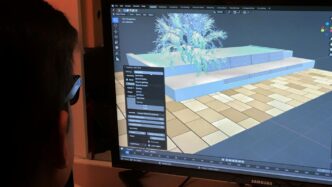
Utilizing CAD Software for Digital Patterns
Computer-Aided Design (CAD) software has really changed the game for pattern making. Instead of drawing everything by hand on paper, which can be slow and prone to errors, you can create digital patterns. This means you can easily make changes, duplicate pieces, and even see how the garment might look in 3D before you even cut any fabric. It’s like having a virtual fitting room for your patterns.
- Digital patterns are easier to store and share. No more piles of paper patterns taking up space.
- Changes are simple. Need to adjust a seam line or add a dart? Just a few clicks.
- Accuracy is way up. Software can measure and draft with incredible precision.
- It helps with grading. Making different sizes from your base pattern becomes much more straightforward.
Industry-Leading Digital Platforms
There are a bunch of different software programs out there that the pros use. Some of the big names you’ll hear about include Gerber Accumark, Lectra, and Optitex. Each one has its own way of doing things, and they can be pretty powerful tools. Choosing the right one often depends on what your manufacturing partners are using and what your specific needs are. It’s a good idea to check if the software you’re considering can talk to the machines your factory uses, like plotters and printers, and if the file types it creates are pretty standard. You don’t want to get stuck with a system that nobody else can use.
Ensuring Scalability and Global Compatibility
One of the best things about digital patterns is how easy it is to scale them up or down for different sizes. This process, called grading, used to be a real chore. Now, software can handle it pretty automatically. This is super important if you plan to sell your clothes in lots of different sizes or even in different countries, as sizing can vary a lot. Using industry-standard software also means your patterns are more likely to be compatible with factories all over the world. This makes it much simpler to work with manufacturers in different locations without worrying about file format issues or measurement discrepancies. It really smooths out the whole production process, from your initial design to the final product hitting the shelves.
Documentation and Finalization of Patterns
Once your pattern is looking just right after all the fittings and tweaks, it’s time to get it all written down. This is where pattern making cards come into play. Think of them as the instruction manual for your garment, but way more detailed. They show every single piece of the pattern, exactly how big it is, and where it goes. It’s super important because this is what the factory will use to cut the fabric. These cards make sure everyone is on the same page, from the designer to the person sewing the final product.
Creating Detailed Pattern Making Cards
These cards are more than just a list of measurements. They’re a complete picture of your design. We put down all the specifics, like:
- Individual pattern pieces with their exact dimensions.
- How much seam allowance to add and where.
- Which way the fabric grain should run for each piece.
- Any special marks or notches needed for assembly.
- Notes on how the pieces go together.
Understanding Pattern Card Components
When you look at a pattern card, you’ll see a lot of information. There’s the name of each pattern piece, its size, and a version number. We also include things like:
- Grainline: This tells you the direction of the fabric’s warp threads, which affects how the fabric hangs and stretches.
- Seam Allowances: The extra fabric added to the edges of pattern pieces for sewing. We specify the width and type (e.g., plain, serged).
- Notches and Marks: Small cuts or marks on the pattern edges that help align pieces correctly during sewing. These are super handy for things like matching side seams or setting in sleeves.
- Drill Holes: Sometimes small holes are marked on the pattern to indicate specific points, like the corner of a placket or where a button should go.
Final Production Pattern Approval
After everything is documented on the pattern making cards and you’ve given it the thumbs up, we create the final production pattern. This is the official version that will be used for grading into different sizes and for mass production. It’s the culmination of all the work, making sure your design is ready to go. If you need to make changes later, like for a new collection or different fabric, our alteration services can help adapt this final pattern.
Ongoing Evolution Through Pattern Alteration Services
So, you’ve got your first prototype pattern, and it looks pretty good, right? But the journey doesn’t stop there. Think of your pattern as a living document, something that can and should adapt as your vision clarifies or as the market shifts. This is where pattern alteration services really shine.
Modifying Designs for New Styles
Sometimes, you might have a core pattern that you love, but you want to spin it into something slightly different for a new collection. Alteration services can take your existing pattern and tweak it to create variations. Maybe you want to change the neckline, add a different sleeve style, or adjust the hemline. These modifications allow you to maximize the potential of your original design work without starting from scratch each time. It’s a smart way to build a cohesive line of garments efficiently.
Adjusting Patterns Based on Sample Feedback
This is a big one. After you get your first samples made, you’ll inevitably get feedback. Maybe the fit isn’t quite right in a certain area, or perhaps the drape isn’t what you expected. This is precisely the time to use alteration services. You can provide the feedback from your fittings and sample evaluations, and the pattern makers will adjust the pattern accordingly. This iterative process is key to achieving that perfect fit and finish that customers will love. It’s about refining the design until it’s just right.
Adapting Patterns for Different Fabrics and Sizes
Different fabrics behave differently. A pattern drafted for a stiff denim might not work well for a flowy rayon. Alteration services can help you adapt your pattern to account for the unique properties of new materials, like shrinkage, stretch, or drape. You might also need to expand your size range. Grading, the process of creating different sizes from a base pattern, can be handled through these services, making your design accessible to a wider audience. Using digital pattern-making software can streamline this adaptation process significantly, ensuring consistency across all sizes and fabric types.
Resources and Support for Pattern Making Success
So, you’ve got your designs, you’ve figured out the basics of pattern making, and now you’re looking for a little extra help or maybe just want to keep learning. That’s totally normal. This whole process can feel like a lot sometimes, and having the right resources makes a huge difference. Think of it like having a good toolbox when you’re trying to build something – you need the right tools and a bit of guidance.
There are tons of places to get that support. For starters, many services offer detailed guides that walk you through each step of pattern making. These aren’t just quick tips; they’re more like mini-courses that explain the ‘why’ behind certain techniques. It’s really helpful when you’re trying to get a handle on things like grading or adding seam allowances. You can often find these on the websites of pattern making services or software providers. These learning materials are designed to help you understand the entire workflow, from initial concept to the final production pattern.
Beyond just guides, there’s a whole library of technical documents out there. These are great for when you need to look up specific standards or understand the finer points of pattern construction. It’s like having a reference book for all things pattern-related. If you’re working with different fabrics or trying to achieve a specific drape, these documents can be a lifesaver. They often cover things like fabric properties and how they affect pattern adjustments.
Here’s a quick look at what you might find:
- Service Learning Resources: Step-by-step instructions, video tutorials, and case studies.
- Guide Reference Library: Technical specs, industry standards, and material guides.
- Service Essentials Kit: Templates, checklists, and workflow charts to keep you organized.
And what happens after you’ve got your patterns sorted? Well, things don’t just stop there. Many places offer ongoing support. This could be anything from troubleshooting issues with your digital files to getting advice on adapting patterns for new collections. For example, if you’re looking to create production-ready DXF patterns quickly, tools can help speed things up considerably. It’s good to know that help is available if you run into a snag or want to tweak your designs further. They can help you adapt patterns for different fabrics and sizes, which is super useful as your brand grows.
Wrapping It Up
So, we’ve gone through a lot about making patterns for clothes. It’s really the step that takes a drawing and turns it into something you can actually wear. Getting the details right, like where the sleeves go or how the collar sits, makes a big difference in how the final piece looks and feels. Testing out samples helps catch any weird fit issues before you use expensive fabric. Knowing how all the flat pieces come together is pretty important for making sure the finished garment keeps its shape. Honestly, getting a handle on pattern making is a big deal if you want to make your clothing ideas real. When you nail this part, you can create clothes that people will actually want to wear and feel good in. That sketch on paper? It becomes a real sweater or jacket. It’s a key step from just an idea to something tangible. If you’re thinking about starting your own clothing line, learning this skill will be super helpful as you get your designs out there.