Getting your smart home devices to talk to each other can feel like a puzzle, especially when they use different languages. Home Assistant is a great way to bring everything together, and this guide focuses on using Zigbee, a popular wireless protocol. We’ll walk through how to set up Home Assistant and integrate your Zigbee devices, making your smart home work more smoothly. It’s all about making your tech play nice.
Key Takeaways
- Home Assistant acts as a central platform for managing all your smart devices, offering local control and privacy.
- MQTT is a messaging protocol that acts as a bridge for devices to communicate, and setting up a broker like Mosquitto is a common first step.
- Zigbee2MQTT is a popular add-on for Home Assistant that allows you to connect and control a wide range of Zigbee devices without needing manufacturer hubs.
- Pairing Zigbee devices involves putting both your coordinator and the device into pairing mode, often through the Zigbee2MQTT interface.
- Once integrated, Zigbee devices can be used in Home Assistant automations to create more complex and useful smart home routines.
Understanding Home Assistant’s Core Functionality
Home Assistant is a pretty neat piece of software that acts as the brain for your smart home. Think of it as a central hub where all your different smart gadgets can talk to each other, regardless of who made them. This is a big deal because, let’s face it, the smart home world can be a bit of a mess with devices from different brands not always playing nicely together. Home Assistant aims to fix that.
Home Assistant: The Central Smart Home Platform
At its heart, Home Assistant is an open-source platform. This means it’s free to use and has a huge community behind it, constantly working to make it better. What makes it stand out is its focus on local control. This means most of your smart home’s operations happen right in your house, not on some company’s server in the cloud. This is great for privacy and also means your automations will keep working even if your internet connection goes down. It supports a wide range of communication methods, including Wi-Fi, Bluetooth, and importantly for this guide, Zigbee. You can interact with Home Assistant through a web browser, a mobile app, or even voice commands.
Installation Methods and User Interface Navigation
Getting Home Assistant up and running can be done in a few ways. You can install it on a dedicated device like a Raspberry Pi, a mini PC, or even a virtual machine. Once installed, you’ll access it through a web interface. The user interface is generally well-organized. You’ll find sections for devices, entities (which represent individual device functions, like a light’s on/off state), automations, and settings. It might seem a bit much at first, but you get used to it pretty quickly. The interface is where you’ll add new devices, set up automations, and generally manage your smart home.
Local Control and Privacy Focus
As mentioned, Home Assistant really shines when it comes to local control. This approach means your data stays within your home network. You’re not sending information about your lights, sensors, or routines to external servers. This is a significant advantage for privacy-conscious users. It also contributes to a more reliable smart home. If your internet service provider has an outage, your lights will still turn on when you flip the switch, and your motion sensors will still trigger automations. This focus on keeping things local is a core philosophy of the project and a major reason why people choose Home Assistant over other solutions.
Essential MQTT Integration for Zigbee
Before we get our Zigbee devices talking to Home Assistant, we need to set up a communication backbone. For Zigbee2MQTT, this backbone is MQTT. Think of MQTT as a messaging system where devices can publish information and other devices can subscribe to that information. It’s lightweight and works really well for the kind of data smart home devices send.
The Role of MQTT in Smart Homes
MQTT, which stands for Message Queuing Telemetry Transport, is a publish-subscribe messaging protocol. In a smart home context, it acts as a central hub for communication between different devices and applications. Your Zigbee devices, through Zigbee2MQTT, will publish their status (like temperature readings, on/off states, or battery levels) to specific ‘topics’ on an MQTT broker. Home Assistant, in turn, subscribes to these topics to receive the data and display it, allowing you to control devices and create automations. This message-brokering system is what allows disparate devices and software to communicate effectively. Without it, Zigbee2MQTT wouldn’t be able to send device information to Home Assistant.
Setting Up the Mosquitto Broker Add-on
To get started with MQTT, you’ll need an MQTT broker. The easiest way to do this within Home Assistant is by using the Mosquitto broker add-on. It’s a popular and reliable choice.
Here’s how to get it running:
- Go to your Home Assistant Settings -> Add-ons -> Add-on Store.
- Search for "Mosquitto broker" and select it.
- Click Install. Wait for the installation to complete.
- Once installed, go to the add-on’s page and click Start.
- Next, you’ll want to configure it. Click on the Configuration tab. You’ll need to set a username and password for accessing the broker. Make a note of these credentials, as you’ll need them later.
- After setting your credentials, go back to the Info tab and click Save.
Configuring the MQTT Integration
Now that you have a broker running, you need to tell Home Assistant how to connect to it. This is done through the MQTT integration.
- Navigate to Settings -> Devices & Services.
- Click the + Add Integration button in the bottom right corner.
- Search for "MQTT" and select it.
- In the configuration window, you’ll need to enter the details for your Mosquitto broker:
- Broker: Enter
localhost(or your Home Assistant’s IP address if you’re not running the add-on directly on the same machine). - Port: The default is
1883. - Username: Enter the username you created for the Mosquitto broker.
- Password: Enter the password you created for the Mosquitto broker.
- Broker: Enter
- Click Submit. If everything is configured correctly, the MQTT integration should connect successfully. You can check the status in the Devices & Services list. This setup is a key step for many integrations, including migrating your Zigbee2MQTT network.
With MQTT set up, you’ve laid the groundwork for Zigbee2MQTT to communicate with Home Assistant. The next step is to install and configure Zigbee2MQTT itself.
Integrating Zigbee Devices with Zigbee2MQTT
So, you’ve got your Home Assistant humming along and you’ve got MQTT sorted out. Now comes the fun part: getting those little Zigbee devices talking to everything. This is where Zigbee2MQTT really shines. It’s basically a bridge that lets your Zigbee devices communicate over MQTT, which Home Assistant already understands. This add-on is your gateway to a vast ecosystem of Zigbee gadgets.
What is Zigbee2MQTT?
Think of Zigbee2MQTT as a translator. Zigbee is a specific language that many smart home devices use, but Home Assistant doesn’t speak it directly. Zigbee2MQTT listens to Zigbee devices and translates their messages into MQTT messages. Then, Home Assistant, which is already set up to listen to MQTT, can understand and use those messages. It’s a pretty clever way to get devices from different manufacturers to play nicely together. It supports a huge number of devices, and the community is always adding more. You can find a list of supported devices on their website, which is super helpful before you buy anything new.
Installing the Zigbee2MQTT Add-on
Getting Zigbee2MQTT into Home Assistant is pretty straightforward, especially if you’ve already installed add-ons before. You’ll need to add the Zigbee2MQTT repository to your add-on store first. Head over to Settings -> Add-ons -> Add-on store, then tap the three dots in the top right corner and select ‘Repositories’. Paste in the Zigbee2MQTT repository URL and click ‘Add’. Once that’s done, you should see the Zigbee2MQTT add-on appear in your store. Just click on it and hit ‘Install’.
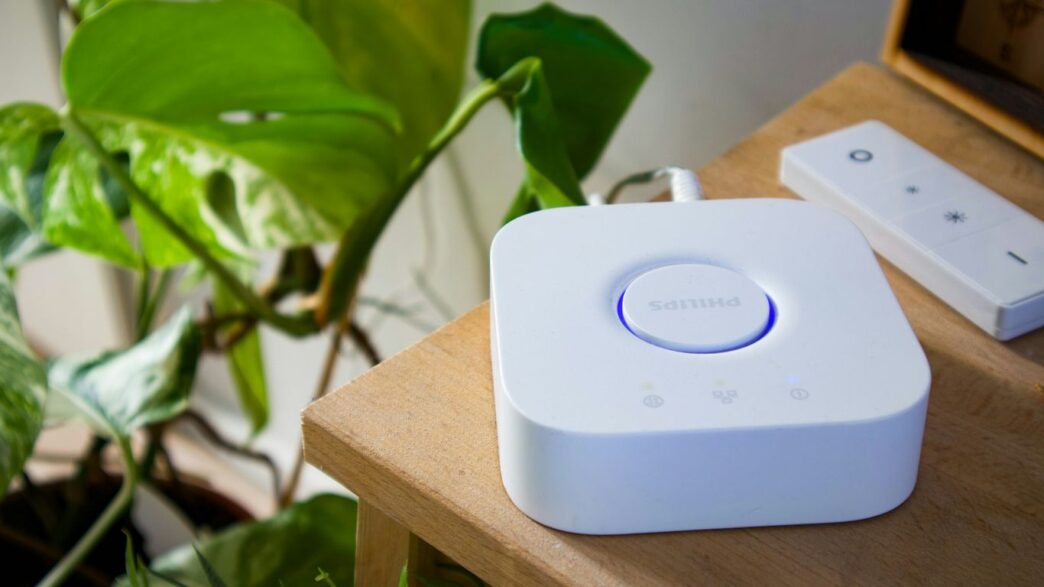
Connecting Your Zigbee Coordinator
This is a really important step. Your Zigbee coordinator is the physical USB stick that actually talks to your Zigbee devices. You need to tell Zigbee2MQTT which coordinator you’re using and where it is. After installing the add-on, go to its configuration page. You’ll see sections for MQTT settings and serial settings. For the serial part, you’ll need to specify the port your coordinator is connected to. It often looks something like /dev/ttyUSB0 or /dev/ttyACM0. If you’re unsure, you can often find this information in Home Assistant’s hardware settings. Make sure your MQTT details are correct too, pointing to your Mosquitto broker. Once configured, start the add-on and open its Web UI. You’re now ready to start pairing devices!
Pairing and Managing Zigbee Devices
Alright, so you’ve got Zigbee2MQTT up and running, and your Zigbee coordinator is plugged in. Now comes the fun part: getting your actual Zigbee devices talking to Home Assistant. It’s not usually too complicated, but sometimes you hit a snag. Let’s walk through it.
Initiating Device Pairing with Zigbee2MQTT
Getting a new Zigbee device into your network is pretty straightforward. You’ll typically do this through the Zigbee2MQTT web interface. First, you need to tell Zigbee2MQTT that it should be listening for new devices. Look for a button that says something like "Permit Join" or "Allow adding new devices." Click that. This puts your Zigbee network into a ‘discovery’ mode.
Next, you need to wake up your Zigbee device and tell it to start looking for a network to join. How you do this varies a lot by device. Most of the time, it involves pressing a small button on the device. Sometimes it’s a quick press, other times you might need to hold it down for a few seconds until an LED starts blinking. Check the manual for your specific device if you’re not sure. Once the device is in pairing mode, Zigbee2MQTT should find it automatically within a minute or two.
Understanding Device Information in Zigbee2MQTT
After a device successfully joins your network, it’ll show up in the Zigbee2MQTT interface. You’ll usually see a list of all your connected devices. Clicking on a device will bring up more details. This is where you can see things like:
- Name: The friendly name you give the device.
- IEEE Address: A unique identifier for the device.
- Manufacturer & Model: Tells you who made it and what specific model it is.
- LQI (Link Quality Indicator): This is a number that tells you how strong the signal is between the device and its nearest router (or the coordinator). A higher number generally means a better connection. You’ll want to keep an eye on this, especially if you notice devices acting up.
- Exposes: This section is super important. It shows you all the different functions and data points the device can send or receive. For a smart bulb, this might include on/off status, brightness, and color. For a motion sensor, it’ll show motion detection status and maybe battery level.
Troubleshooting Device Inclusion
Sometimes, devices just don’t want to join. Don’t panic, it happens. Here are a few things to try:
- Check the Basics: Make sure your Zigbee coordinator is powered on and that Zigbee2MQTT is running without errors. Also, double-check that you’ve actually enabled ‘Permit Join’ in Zigbee2MQTT.
- Device Placement: Is the device too far from your Zigbee coordinator or another Zigbee router (like a smart plug or bulb)? Try moving it closer for the initial pairing. You can always move it back later. Remember, Zigbee devices create a mesh network, so other Zigbee devices can act as repeaters to extend the range.
- Reset the Device: If a device has been paired before, or if it’s just being stubborn, try factory resetting it. Again, check the device’s manual for how to do this. After resetting, try the pairing process again.
- Check Zigbee2MQTT Logs: If you’re still stuck, the Zigbee2MQTT logs can be your best friend. They often contain error messages that can give you a clue about what’s going wrong. You can usually access these logs directly from the Zigbee2MQTT add-on page in Home Assistant.
- Interference: While less common, other wireless devices operating on the 2.4GHz band (like some Wi-Fi routers) can sometimes cause interference. If you’ve tried everything else, you might consider changing the Zigbee channel in Zigbee2MQTT’s configuration, but this is usually a last resort and requires re-pairing all your devices.
Advanced Zigbee Integrations and Automations
So, you’ve got your Zigbee devices all hooked up and talking to Home Assistant. That’s awesome! But honestly, that’s just the beginning. The real magic happens when you start making these devices work together in smart ways, and when you can pull data from them to do even cooler stuff.
Leveraging Zigbee Data in Home Assistant
Think about all the information your Zigbee devices are collecting. Motion sensors know when someone’s in a room, door sensors know if they’re open or closed, and smart plugs can tell you if a device is on or off, and sometimes even how much power it’s using. Home Assistant can grab all this data and use it for all sorts of things. You can see it all in the device’s entity page, and if you want to get fancy, you can add specific data points to your dashboard. For example, if you have a smart energy meter, you can see its real-time consumption right on your main screen. It’s pretty neat to have all that info at a glance.
Creating Automations with Zigbee Devices
This is where things get really fun. You can set up rules so that when one Zigbee device does something, another one reacts. For instance, you could have a motion sensor in the hallway turn on a light when it detects movement after sunset. Or, if a door sensor is triggered while you’re away (and Home Assistant knows you’re away), you could get a notification on your phone. You can even combine Zigbee devices with other types of smart devices you might have. The possibilities are pretty much endless, limited only by what you can imagine.
Here are a few ideas to get you started:
- Welcome Home: When your phone (or another presence tracker) shows you’ve arrived home, turn on the entryway light and maybe unlock a smart lock.
- Energy Saving: If a smart plug connected to a TV has been off for a certain amount of time, turn off the associated power strip to cut "vampire" drain.
- Security Alert: If a door or window sensor is opened while the alarm system is armed, send an immediate notification to your phone and flash a specific light red.
Integrating Specific Zigbee Devices (e.g., Smart Meters)
Some Zigbee devices are a bit more specialized, like smart energy meters. Getting these set up might require a few extra steps, but the payoff is usually worth it. For a smart energy meter, once it’s paired through Zigbee2MQTT, Home Assistant can start tracking your energy consumption. You can see the live data, view historical usage charts, and even use that information to create automations. For example, you could set up an automation to turn off non-essential appliances if your total energy usage goes above a certain threshold. It’s a great way to keep an eye on your electricity bill and be more mindful of your power usage.
Exploring Other Smart Home Protocols
So, you’ve got your Zigbee devices humming along nicely with Home Assistant. That’s awesome! But what happens when you start looking at other gadgets, maybe a smart lock that uses Z-Wave, or some Wi-Fi plugs from a different brand? It can feel a bit like trying to get people speaking different languages to have a conversation. Home Assistant, thankfully, is pretty good at being a translator.
Understanding Z-Wave and Thread Networks
While Zigbee is great, it’s not the only player in town. You’ll often run into Z-Wave, especially with things like door locks and sensors. Z-Wave is another low-power wireless protocol, but it operates on a different frequency than Zigbee. This is actually a good thing because it means they don’t interfere with each other. Think of it like having two separate radio stations – one for Zigbee and one for Z-Wave.
- Z-Wave: Known for its reliability and guaranteed interoperability. If a device is Z-Wave certified, it’s supposed to work with other Z-Wave devices, regardless of the brand. It uses a mesh network, similar to Zigbee, but with a different underlying structure.
- Thread: This is a newer one, built on top of IP (Internet Protocol). It’s designed to be secure, low-power, and reliable, and it’s a key part of the Matter standard. You’ll see it more and more in newer devices.
Adding Z-Wave Devices to Home Assistant
Adding Z-Wave devices is pretty similar to adding Zigbee, but you’ll need a Z-Wave controller. This is usually a USB stick that plugs into your Home Assistant machine.
- Get a Z-Wave Controller: You’ll need a USB Z-Wave stick. Popular choices include Aeotec Z-Stick or Zooz Z-Wave Plus S2 Stick.
- Install the Z-Wave JS Integration: In Home Assistant, go to Settings -> Devices & Services -> Add Integration. Search for ‘Z-Wave JS’.
- Configure the Integration: You’ll likely need to specify the path to your Z-Wave USB stick. If you’re running Home Assistant OS or Supervised, you might need to install the Z-Wave JS Add-on first from the Add-on Store.
- Include Devices: Once the Z-Wave integration is set up, you’ll put your Z-Wave devices into pairing mode (check their manuals!) and then use the Z-Wave JS interface to ‘include’ them. It’s usually a button within the Z-Wave JS control panel.
Thread Border Routers and Matter
Thread is where things get interesting, especially with the push towards Matter. Matter is a new standard aiming to make smart home devices from different companies work together more easily. Thread is one of the main ways devices communicate using Matter.
A Thread Border Router acts like a bridge, connecting your Thread network to your regular Wi-Fi or Ethernet network. Devices like the Apple HomePod Mini, Google Nest Hub (2nd gen), and Amazon Echo (4th gen) can act as Thread Border Routers. Home Assistant can also integrate with these border routers, or you can set up your own using specific hardware.
- Why Matter? It simplifies setup and allows devices to talk to each other locally, even if they’re from different brands and don’t use the same cloud services.
- How it works: Thread devices form a low-power mesh network. The Thread Border Router lets these devices talk to your home network and, by extension, to Home Assistant.
- Home Assistant’s Role: Home Assistant can act as a Matter controller, allowing you to add and manage Matter-compatible devices, including those using Thread. This means your Zigbee, Z-Wave, and Matter devices can all be managed from one place.
It’s a bit of a puzzle sometimes, getting all these different protocols to play nice, but Home Assistant really shines here. It’s like the ultimate smart home diplomat, making sure everyone gets along.
Wrapping Up Your Smart Home Journey
So, we’ve gone through setting up Home Assistant and getting Zigbee devices, like our smart meters, talking to it using Zigbee2MQTT. It might seem like a lot at first, but once it’s all connected, it really makes your smart home work better. You get more control, and things can happen automatically without needing the cloud. This whole setup means your devices can work together, no matter who made them. Keep playing around with it, and you’ll find even more ways to make your home smarter and more convenient.
Frequently Asked Questions
What is Home Assistant and why should I use it for my smart home?
Home Assistant is like a super-smart brain for your house that controls all your gadgets. It’s a free program that lets you connect devices from different brands, like lights, locks, and sensors, all in one place. This means you can make them work together, even if they weren’t originally designed to. Plus, it keeps your data private by working mostly on your home network, not the internet.
What is Zigbee and how does it work with Home Assistant?
Zigbee is a way for smart devices to talk to each other, like a secret language they all understand. To use Zigbee devices with Home Assistant, you need a special USB stick called a ‘Zigbee coordinator.’ This stick acts like a translator, letting Home Assistant understand the Zigbee language. Then, you use a tool called Zigbee2MQTT to connect these devices to Home Assistant.
What is Zigbee2MQTT and why is it important?
Zigbee2MQTT is a helpful tool, or ‘add-on,’ for Home Assistant that makes it easy to connect many different Zigbee devices. Think of it as a bridge that translates the signals from your Zigbee gadgets so Home Assistant can understand and control them. It’s super useful because it works with tons of devices and keeps your control local, meaning it doesn’t rely on the internet.
How do I connect a new Zigbee device to Home Assistant using Zigbee2MQTT?
First, make sure your Zigbee coordinator is plugged in and Zigbee2MQTT is set up in Home Assistant. Then, open the Zigbee2MQTT control panel and click a button like ‘Permit Join’ or ‘Allow adding new devices.’ Next, put your Zigbee device into ‘pairing’ mode, which usually involves pressing a button on it. Zigbee2MQTT will then find the device and add it to your smart home system.
What is MQTT and do I really need it for Zigbee?
MQTT is a communication system that helps different parts of your smart home talk to each other. For Zigbee2MQTT to work smoothly with Home Assistant, you usually need an MQTT broker, which is like a message center. The Mosquitto Broker add-on is a popular choice for this. It helps Zigbee2MQTT send information to Home Assistant reliably.
Can Home Assistant work with other smart home technologies besides Zigbee?
Absolutely! Home Assistant is very versatile. It can also connect with devices that use Z-Wave, which is similar to Zigbee, and newer technologies like Thread and Matter. This means you can build a smart home using a wide variety of devices and communication methods, all managed from one central place.