So, you’re looking to get more out of your 3D prints, huh? It’s not just about the outer shell; what’s going on inside your model really matters. We’re talking about infill 3d printing, the stuff that gives your prints their strength and keeps them from being just hollow shells. It sounds simple, but there’s actually a lot to think about, from the patterns you choose to how much of it you actually put in there. Let’s break down how to get this right so your prints turn out exactly how you want them.
Key Takeaways
- Understanding different infill patterns like grid, honeycomb, and gyroid helps you pick the right one for strength, weight, or flexibility.
- Adjusting infill density, shown as a percentage, lets you control how strong and heavy your print will be, saving material and time if you don’t need it super solid.
- Strategic infill design, like using variable density in high-stress spots, can make parts much stronger without adding a lot of extra material.
- Good support structures are vital for overhangs and details, preventing droopy bits and ensuring your print looks clean after removal.
- Troubleshooting common infill issues, such as layer adhesion problems or warping, often involves tweaking print settings or adjusting the infill pattern and density.
Understanding Infill 3D Printing Fundamentals
Alright, let’s talk about the guts of your 3D prints – the infill. It’s that internal structure you don’t usually see, but it’s doing a lot of heavy lifting, literally. Think of it as the skeleton of your object. Without it, your prints would be flimsy and probably collapse.
The Role of Infill in Print Strength and Weight
So, why bother with infill? Well, it’s all about balancing what you want your print to do. If you need something strong, like a bracket to hold a shelf, you’ll want more infill. This makes the object heavier, sure, but it also makes it much tougher. On the flip side, if you’re printing a decorative piece that doesn’t need to hold much weight, you can get away with less infill. This saves you filament and, importantly, cuts down on print time. The amount of infill you choose directly affects how strong and heavy your final print will be. It’s a trade-off, and figuring out that sweet spot is key.
Here’s a quick look at how infill percentage can change things:
| Infill Percentage | Resulting Strength | Material Usage | Print Time |
|---|---|---|---|
| 0-5% | Very Low | Minimal | Fastest |
| 10-20% | Moderate | Low | Fast |
| 20-40% | Good | Medium | Moderate |
| 40%+ | Very High | High | Slowest |
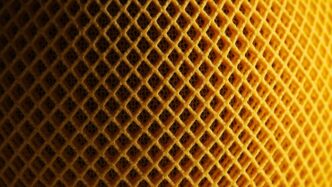
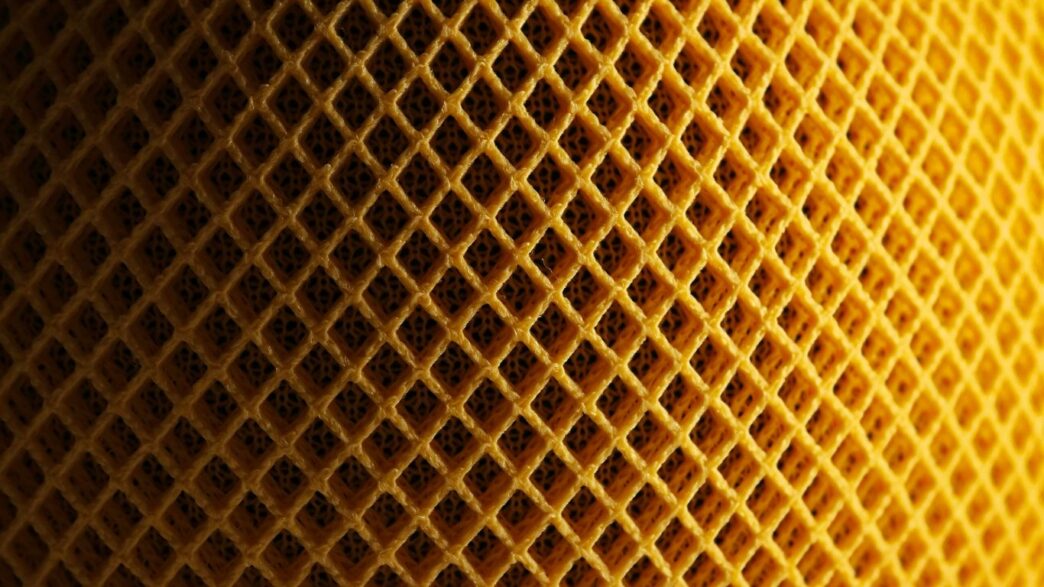
Exploring Common Infill Patterns
It’s not just about how much infill you have, but also the pattern it takes. Different patterns offer different benefits. You’ve got your basic ones, like:
- Grid: This is a straightforward crisscross pattern. It’s pretty strong and uses a decent amount of material.
- Honeycomb: This looks like a honeycomb, obviously. It’s good for saving material while still offering decent strength, especially if the force is coming from different directions.
- Gyroid: This one is a bit more complex, looking like a wavy, interconnected structure. It’s known for being strong no matter which way you push or pull on it, making it great for functional parts that might experience stress from all angles. You can find some great examples of different infill patterns online.
Choosing the right pattern can make a big difference in how your print performs under stress.
Balancing Speed and Detail with Layer Height
Now, let’s talk about layer height. This is basically how thick each individual layer of plastic your printer lays down is. It’s another setting that really impacts the final look and feel of your print.
- Thicker Layers (0.3mm and up): These print much faster. You’ll notice the lines more, giving it a more textured look. This is fine for big, simple objects where speed is the main goal.
- Thinner Layers (0.1mm to 0.2mm): These take longer to print, but you get a much smoother surface and finer details. This is what you want for models where appearance matters, or if there are small, intricate features.
Finding that balance between how fast you want your print to finish and how detailed you need it to be is a constant juggling act. It’s worth playing around with different layer heights to see what works best for your projects.
Optimizing Infill Density and Patterns
Alright, so we’ve talked about what infill is and why it matters. Now, let’s get into the nitty-gritty of actually making it work for you. It’s not just about picking a pattern; it’s about tweaking how much of it you use and which one fits the bill for what you’re trying to print.
Adjusting Infill Percentage for Desired Properties
Think of infill percentage as how
Advanced Infill Design Techniques

So, you’ve got the basics of infill down, but what if you need your prints to be tougher, lighter, or just plain smarter? That’s where advanced infill design comes in. It’s not just about picking a pattern and a percentage anymore; we’re talking about really tailoring the inside of your print to do exactly what you need it to do.
Variable Infill Density for High-Stress Areas
Think about a bracket holding up a shelf. The part where it attaches to the wall needs to be super strong, right? But the part sticking out might not need as much support. This is where variable infill density shines. You can tell your slicer to pack more material (higher percentage) into those critical zones and use less (lower percentage) elsewhere. This saves material and print time without sacrificing strength where it counts. It’s like reinforcing a bridge only where the traffic is heaviest.
- Identify stress points: Look at your model and figure out where it’s likely to bend, break, or take the most load.
- Set higher infill: In your slicer software, increase the infill percentage for those specific areas.
- Lower infill elsewhere: Reduce the percentage for parts of the model that don’t need as much support.
This approach is fantastic for functional parts that need to withstand real-world forces. You can learn more about different infill patterns and how they contribute to strength.
Custom Infill Patterns for Specific Mechanical Needs
Sometimes, the standard patterns just don’t cut it. Maybe you need a part that can absorb impact, or one that’s strong in a very specific direction. This is where you might get creative. While most slicers offer a good selection, you can sometimes design your own internal structures or use specialized patterns. For instance, a pattern that looks like a series of interconnected waves might offer good strength in multiple directions, almost like a natural bone structure. The gyroid pattern is a popular choice for this kind of multi-directional strength, making it great for large 3D prints.
Designing Internal Structures for Complex Parts
This is where things get really interesting. Instead of just filling space, you can design internal structures that actively contribute to the part’s function. Imagine creating internal ribs or lattices within a hollow object to give it rigidity without adding much weight. Or perhaps designing internal channels for airflow or fluid dynamics. This requires a bit more planning in your CAD software, but the results can be incredibly sophisticated. You’re essentially building a custom internal skeleton tailored to your exact needs, moving beyond simple infill to create truly optimized components.
Best Practices for Infill 3D Printing
Alright, so you’ve got your slicer settings dialed in, you’re picking out cool infill patterns, and you’re ready to print. But before you hit that button, let’s talk about a few things that can really make or break your print. It’s not just about the pattern or how dense it is; it’s about how you design your model with printing in mind.
Designing for Layer Adhesion and Strength
Think of your 3D print like a stack of pancakes. Each layer needs to stick well to the one below it, right? If they don’t bond properly, your print can just fall apart. To get good layer adhesion, you want to make sure your print lines are actually touching and fusing together. This often means orienting your model so that the main forces it will experience run along the layers, not trying to pull them apart. Also, avoid really sharp corners where stress can build up; a little fillet or chamfer can go a long way. Gradual transitions between thick and thin parts of your model are your best friend here. It helps the plastic flow and bond better.
Effective Support Structure Strategies
Supports are like the scaffolding for your print. They hold up those tricky overhangs and bridges so they don’t sag or collapse. But supports can be a pain to remove, and sometimes they leave nasty marks. For easier removal, try using breakaway interfaces between the support and your model. If you’re printing something hollow, you might even need internal supports. Some slicers have "tree" supports, which are often less material-intensive and easier to get rid of than the standard ones. Picking the right support type and density can save you a lot of cleanup time later.
Material-Specific Design Considerations
Not all plastics are created equal, and what works for PLA might be a disaster for PETG or ABS. For instance, flexible filaments might need thicker walls to keep their shape, while brittle materials like some clear resins should avoid sharp internal corners that can become weak points. High-temperature materials, like ABS, are notorious for warping, so designing with gradual transitions and maybe even adding some cooling pauses can help prevent your print from lifting off the bed. Always check the recommended settings and design tips for the specific filament you’re using; it can save you a lot of failed prints. You can find general guidance on choosing the right infill pattern for different needs.
Troubleshooting Infill 3D Printing Issues
Even with the best intentions and careful setup, sometimes prints just don’t come out right. It happens to everyone, so don’t get too discouraged. Let’s talk about some common problems you might run into with infill and how to fix them.
Addressing Layer Adhesion Problems
This is a big one. If your layers aren’t sticking together well, your print will be weak and might fall apart. You’ll see gaps between layers or the whole thing might just split.
- Check your print temperature. Too low, and the plastic won’t melt enough to bond. Too high, and it might ooze too much, causing other issues.
- Look at your cooling fan. Sometimes, too much cooling too soon can make layers brittle and prevent them from sticking. Try turning it down a bit, especially for the first few layers.
- Slow down your print speed. When things move too fast, the plastic doesn’t have enough time to properly fuse with the layer below it. A slower print speed often leads to much better layer adhesion.
Resolving Warping and Curling with Infill
Warping, where the corners of your print lift off the build plate, is usually caused by uneven cooling and shrinking plastic. While it’s not just an infill problem, the internal structure can play a role.
- Consider your infill pattern. Some patterns, like gyroid, can distribute internal stresses more evenly than simpler ones like grid. This can help reduce the pulling forces that cause warping.
- Adjust infill density. A very high infill density means more material is shrinking inside the part, which can increase warping. Sometimes, reducing it slightly can help, especially if you’re using a pattern that doesn’t handle stress well.
- Use a brim or raft. These are slicer settings that add extra material around the base of your print to help it stick to the bed. It’s a simple fix that often works wonders. You can find more tips on fixing common FDM 3D printing issues here.
Diagnosing Support Structure Failures
Supports are supposed to be your print’s best friend, holding up overhangs. When they fail, you get droopy, messy sections or the supports themselves break off prematurely.
- Check support density and pattern. If supports are too sparse, they won’t hold up the model. If they’re too dense, they can be hard to remove and might pull the model with them.
- Adjust support Z distance. This is the gap between the support and your model. Too large, and the model won’t be supported well. Too small, and they’ll be impossible to remove cleanly.
- Print orientation matters. Sometimes, the best solution isn’t more supports, but simply turning the model so it has fewer or less severe overhangs. Thinking about how to achieve stronger prints with robust infill is also key here.
Wrapping It Up
So, we’ve gone through a lot about 3D printing infill, from picking the right pattern to getting the density just right. It might seem like a lot at first, but honestly, it’s mostly about trying things out. Don’t be afraid to experiment with different settings on your printer. You’ll learn what works best for the kinds of things you like to make. Keep an eye on those online communities too; people are always sharing cool tips and tricks. With a little practice, you’ll be printing stronger, lighter, and just plain better parts without even thinking about it. Happy making!